By: Ayush Sharma

The standard way to deploy agents on Databricks has been the model serving endpoint. However, Databricks now recommends Databricks Apps as the deployment target for new agents, while the model serving endpoint still remains supported for existing agents.
This blog explores why apps are the preferred option for agentic workloads. We will take a look at how the MLflow Agent Server powers agents on Databricks apps, examine the lifespan method of the underlying FastAPI application, and how you can configure it for initialization work such as opening a connection to Lakebase at application startup.
After that, we take a detailed look at the chat UI template provided by Databricks and how it is integrated into the same app on which we deploy our agent. Finally, I will describe how we, at Cavallo, moved a production agent from a model serving endpoint to a Databricks app, and how on-behalf-of-user (OBO) authorization changed compared to the serving endpoint.
This blog is not a set of steps to follow. Databricks already provides agent templates and prebuilt skills that let a coding assistant configure and deploy one of these apps for you. The aim here is to help you understand how the app works underneath. When you need to customize it, debug it, or explain it, you should know what is really happening.
Why Databricks Apps over the Serving Endpoint?
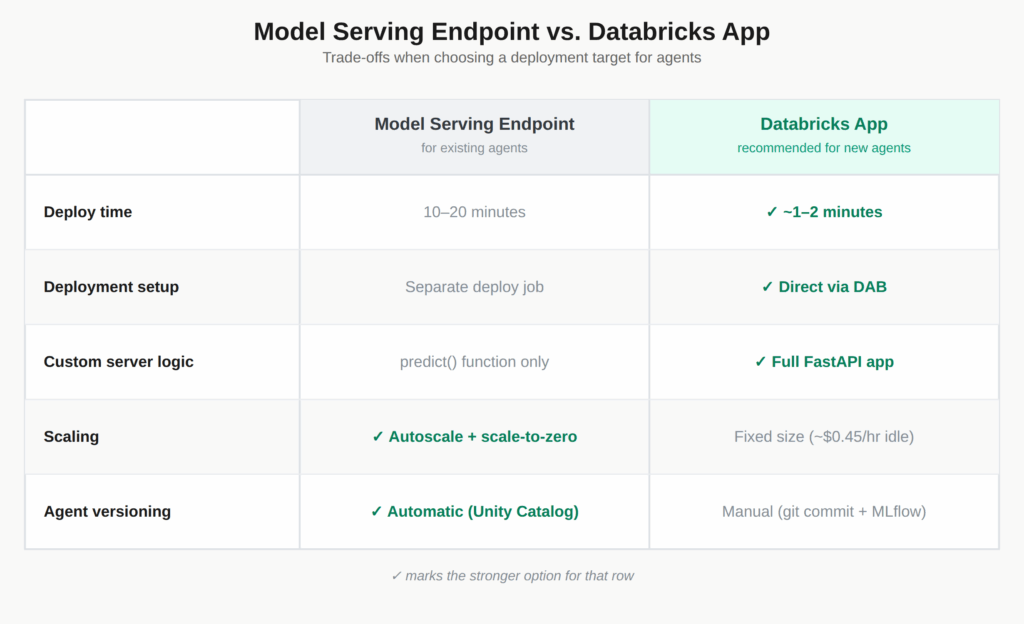
Before we understand the underlying details on deploying agents as an app, let’s first look into reasons as to why you would want to migrate from the serving endpoint to Databricks Apps in the first place.
1. Rapid Iteration: When deploying your agent as a serving endpoint, even for a one-line prompt update, it takes around 10-20 minutes to deploy your agent compared to deploying the agent as an app where the deployment finishes within a minute or two. This enables faster iteration and development.
We ourselves saw this advantage when we deployed our own agent to the Databricks app. We were able to develop and iterate over our agent due to very short deployment time (within a minute) compared to serving endpoints where it took at least 10-20 mins for deployment due to which our development speed was considerably slower.
2. No Separate Deployment Job: Once you have written the code for your agent, deploying the agent as a serving endpoint requires you to develop a separate deployment job that logs the agent code as an MLflow model and then deploys the logged model as a serving endpoint. However, if the agent is deployed as a Databricks app, you deploy the code directly to the app via DAB without the need for a separate deployment job.
This reduces the overhead of developing and maintaining an additional deployment job for serving endpoints, compared to Databricks Apps, where you just need to configure the app as a resource in the DAB yaml file.
3. Adding Custom Middleware and Routes to the Server: When deploying your agent as a serving endpoint, the primary thing you expose and control is the predict function, which makes it difficult to add any custom behavior around your agent. For example, if you want your agent to behave differently based on where the request is coming from, such as giving short answers when it is called from Slack and detailed ones when it is called from the web UI, there is no clean place to put that logic.
When deploying your agent as an app, you control the server itself, so you can add your own routes or middleware to the code. In the same example, a middleware can check each incoming request, identify where it originated from and load the corresponding prompt, making it relatively easy to add this kind of custom logic and server behavior.
There are still few areas where model serving endpoint holds advantage over Databricks App:
- Scaling and Scale-To-Zero: Serving endpoints still hold an advantage in scaling. A serving endpoint autoscales with traffic and can scale down when idle, while an app runs on a fixed size container that you scale manually. Due to the presence of scale-to-zero in serving endpoint and absence in Databricks Apps costs are higher for apps as compared to serving endpoints when both are in idle state. In idle state our own migrated app was costing us 0.45 USD per hour (this might vary for you).
- Agent Versioning: Versioning is also more convoluted for Databricks Apps compared to serving endpoints. When you register a model behind a serving endpoint, Unity Catalog assigns and tracks the version for you automatically, and Databricks lets you attach evaluations and metrics directly to that version, so you can compare how different versions of your agent perform over time. An app has no equivalent built in, so to identify and track different versions of your agent, you may need to fetch the git commit and log an MLflow model named after that commit to uniquely mark the version.
MLflow Agent Server
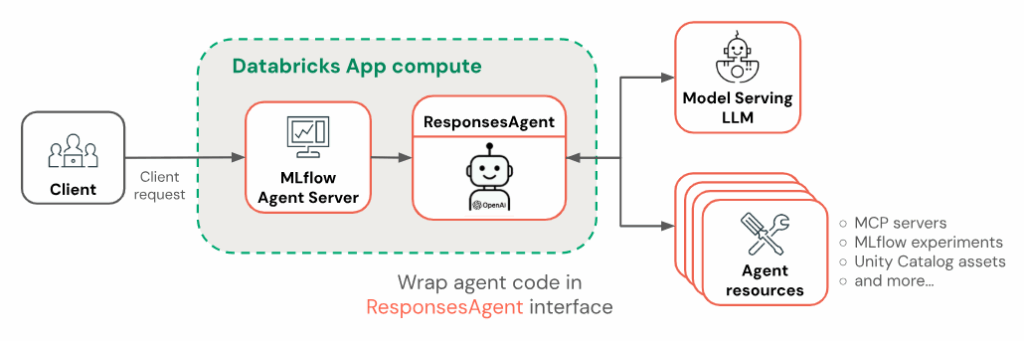
When you deploy your agent as an app, you need a server that accepts the request coming from the client, validates it, and executes your agent logic based on the type of the request. The validation here is done against the Responses API schema.
This is where the MLflow Agent Server comes in, and it is what serves your agent on the app. The MLflow Agent Server is a FastAPI-based server that ships with MLflow, and its main responsibility is executing your agent logic whenever a request from a client arrives on the “/invocations” API route. It gives you two decorators, @invoke and @stream. The methods decorated with these two decorators hold your agent logic, and these are the methods that get mapped to the /invocations route.
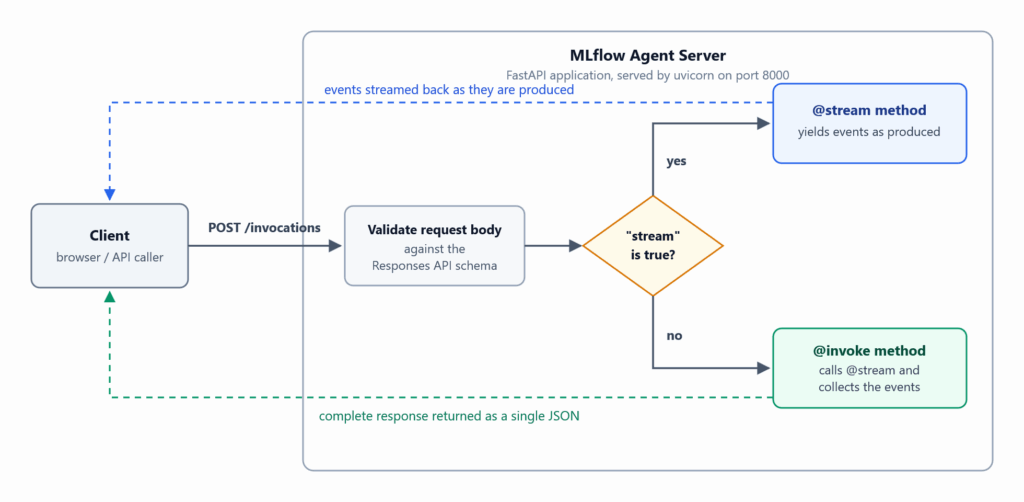
Which of the two methods executes is decided by the stream field of the request. The method with the @stream decorator is responsible for generating streaming responses. Whenever a request arrives with the “stream” field set to true, the server invokes the @stream method and forwards each event to the client as it is produced. Otherwise the @invoke method gets executed and the complete final response is sent back to the client in one piece.
@invoke()
async def invoke_handler(request: ResponsesAgentRequest) -> ResponsesAgentResponse:
    # run your agent here and return the full response
    ...

@stream()
async def stream_handler(request: ResponsesAgentRequest) -> AsyncGenerator[ResponsesAgentStreamEvent, None]:
    # run your agent here and yield events as they are produced
    ...

agent_server = AgentServer("ResponsesAgent", enable_chat_proxy=True)
app = agent_server.app
The agent logic is not written twice. We write the main logic once inside the @stream method and have the @invoke method call it. Instead of sending the chunks of the response to the client, the @invoke method collects the streamed events into the final response and sends it back to the end user.
Putting all this together, this is what happens when a user sends a request:
1. The client sends a POST request to the /invocations route with the conversation input.
2. The server validates the request body against the Responses API schema.
3. The server reads the stream field of the request to decide which method to execute.
4. If the field is set to true, the @stream method runs and every event it yields is streamed back to the client as it is produced.
5. Otherwise, the @invoke method runs, collects the full response, and sends it back to the client as a single JSON response.
The agent server also logs each request made to the “/invocations” route as a trace to an MLflow experiment, which can be configured by setting the experiment’s ID in the MLFLOW_EXPERIMENT_ID environment variable.
The server runs on uvicorn and listens on port 8000 by default, and since the agent server is a FastAPI application, it also inherits the FastAPI way of running code once at startup and once at shutdown. That mechanism is called the lifespan, and it is what we look at next.
MLflow Agent Server Lifespan
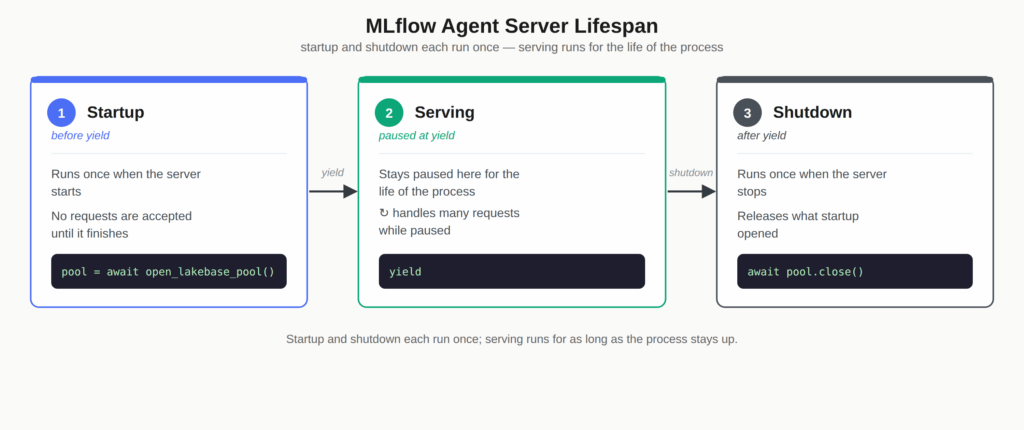
In a FastAPI application, request handlers run once for every request, while some work needs to happen exactly once at app startup, for example opening a database connection, before the first request is ever served. The lifespan is FastAPI’s mechanism for running code at the startup and the shutdown of an application. It is written as a single function with a yield statement in the middle, and the server runs it in three phases. The code before the yield runs when the server starts, and the server does not accept any requests until this code has finished. The function then stays paused at the yield while the server runs and serves requests. The code after the yield runs when the server shuts down.
from contextlib import asynccontextmanager

@asynccontextmanager
async def lifespan(app):
    # Phase 1: runs once at startup. The server accepts no requests until this finishes.
    pool = await open_lakebase_pool()
    app.state.pool = pool
    yield  # Phase 2: the function stays paused here for as long as the server runs.

    # Phase 3: runs once when the server is stopped.
    await pool.close()

# attach the lifespan to the FastAPI app
app.router.lifespan_context = lifespan
For an agent, the main use of the lifespan is the database connections. Opening a connection to Lakebase involves resolving the host, performing a TLS handshake, and minting an OAuth token, which adds up to a noticeable delay. Doing this inside a handler would add that delay to every single message a user sends. The lifespan runs this work once, holds the opened connection pool for the entire life of the server, and every request simply borrows a connection from the pool and returns it.
Serving the Frontend Chat UI
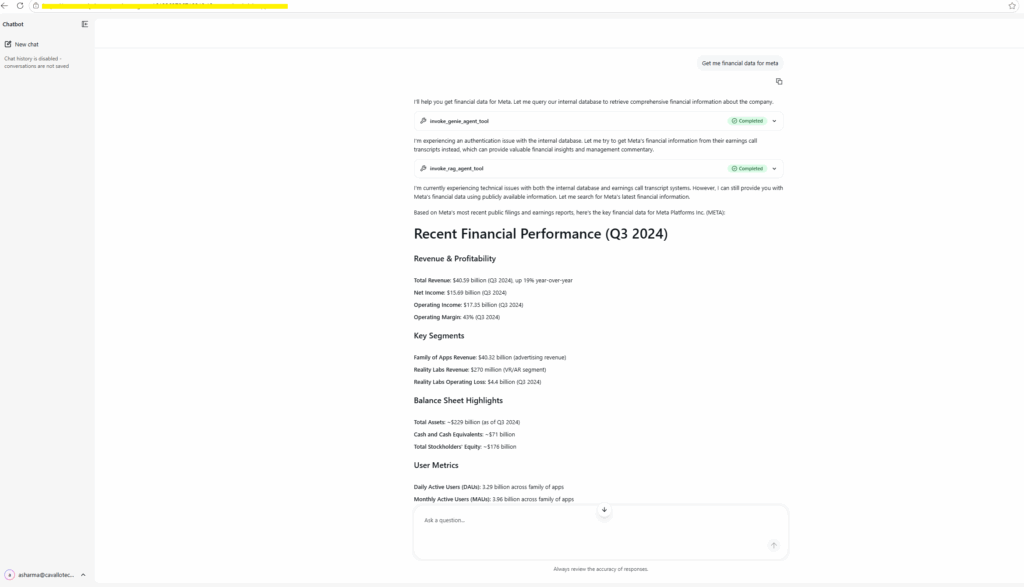
On Databricks Apps, the chat UI can be served from the same app that serves your agent, without a separate deployment. Databricks already provides this UI as a template called e2e-chatbot-app-next, a chat application with streaming, conversation history, and feedback already built in, and we will use it as the reference for this section.
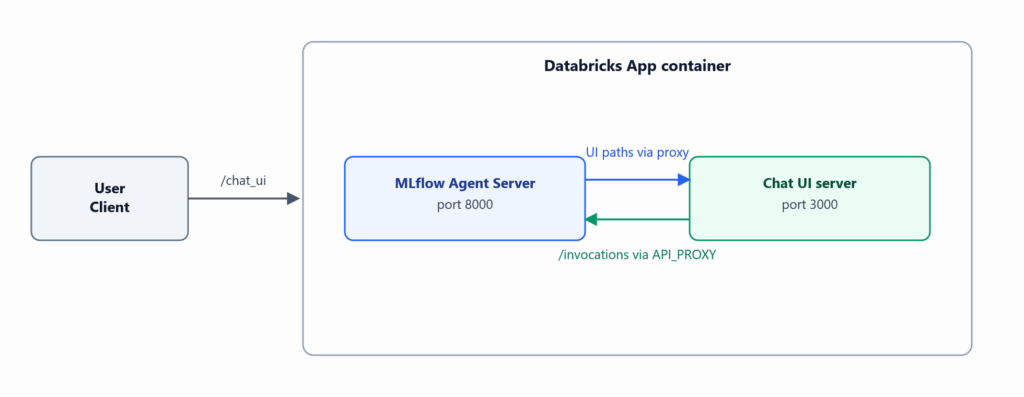
A Databricks App only exposes a single port to the outside world, the one set by the DATABRICKS_APP_PORT environment variable, so every request that reaches the app from outside has to arrive on that one port no matter what it is for. The app’s start command runs a script called start_app.py, which starts two processes inside the container to handle this. The first is the agent server we covered earlier, listening on port 8000, which is the port the platform actually exposes to the outside world. The second is the chat UI server, listening on port 3000 by default through the CHAT_APP_PORT environment variable, and this second process is only reachable from inside the container. This means a request for the chat page itself has to reach the app through port 8000 as well, even though the code that renders that page lives on port 3000, so something inside the container has to bridge the two.
That bridge lives inside the agent server itself, and this routing behavior comes from the MLflow library rather than from the template code. Setting enable_chat_proxy=True when creating the AgentServer installs a middleware on the FastAPI application, and every incoming request passes through it before anything else happens. If the request path matches a route the agent server has registered, such as /invocations, the agent server handles it directly and the middleware does nothing further. If the path does not match any registered route, the middleware checks it against an allowed list of UI paths, and if the path is on that list, it forwards the request to the UI server on port 3000 over localhost and relays the response back to the client.
The middleware only forwards requests that are on this allowed list, and it does this on purpose rather than simply forwarding anything that is not already claimed by the agent server. Forwarding every unmatched request without a list would let a request reach any address the container can see, which is a real security risk, so the middleware only forwards paths that are explicitly allowed and returns a 404 for everything else.
The list starts with the paths the template UI needs, which are /, /favicon.ico, and /ping as exact paths, and /assets/, /api/, and /chat/ as prefixes. If you customize the UI and it serves new paths, you can extend this list through two environment variables, and both of them take comma separated values. CHAT_PROXY_ALLOWED_EXACT_PATHS adds paths that are matched as a whole, so an entry like /robots.txt forwards a request only when its path is exactly /robots.txt. CHAT_PROXY_ALLOWED_PATH_PREFIXES adds paths that are matched by their beginning, so an entry like /docs/ forwards every request whose path starts with /docs/. This lets you expose new parts of the UI without changing any code. The timeout for forwarded requests is controlled by CHAT_PROXY_TIMEOUT_SECONDS and defaults to 300 seconds.
| Environment variable | What it does | Default |
| CHAT_APP_PORT | Port the chat UI server listens on inside the container | 3000 |
| CHAT_PROXY_ALLOWED_EXACT_PATHS | Comma separated paths forwarded to the UI when matched as a whole | |
| CHAT_PROXY_ALLOWED_PATH_PREFIXES | Comma separated path beginnings forwarded to the UI | |
| CHAT_PROXY_TIMEOUT_SECONDS | Timeout in seconds for requests forwarded to the UI | 300 |
The UI server also needs to call the agent itself once a user actually sends a message, and it calls back to the agent server on port 8000 at the /invocations route over localhost, the same way the middleware reached the UI server earlier, using an address it reads from the API_PROXY environment variable. Since this call stays inside the container rather than going back out over the network, it reaches the agent server as a normal request to a registered route, and the middleware simply lets the agent server handle it without needing to forward it anywhere.
Put together, a single chat message makes a short loop through the container. It enters at port 8000 from outside, where the middleware forwards it to the UI server on port 3000 over localhost because its path is on the allowed list, and once the UI server has what it needs from that message, it calls back to port 8000 over localhost on the /invocations route to reach the agent and get a response.
Migrating Our Production Agent from Model Serving
We had a financial supervisor agent deployed as a model serving endpoint in production. It’s a LangGraph ReAct supervisor with a Genie tool for structured data questions, a RAG agent tool that is itself another serving endpoint, and a set of MCP tools.
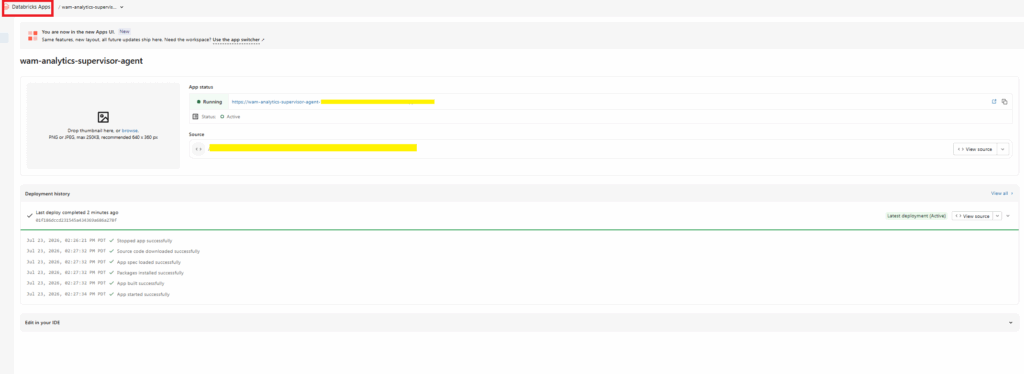
To migrate the agent to an app, we used the migration app template and a migrate-from-model-serving skill provided by Databricks itself. Both were used by the coding assistant, Claude Code in our case, to fully migrate the serving endpoint to a Databricks app.
The assistant downloads the original model artifacts from the serving endpoint, converts the endpoint’s predict and predict_stream methods into the MLflow Agent Server’s @invoke and @stream handlers, scaffolds the app around them, and walks through testing the agent locally before deploying it. It migrated the full agent and delivered it as a self-contained Databricks asset bundle project. Our overall project contains more components than just the agent, so integrating the generated app into our existing project structure was still work we did ourselves.

How on-behalf-of-user authorization changed
One of the important changes the assistant made was for on-behalf-of-user (OBO) authorization, which lets the agent call its tools with the permissions of the user making the request. The serving endpoint handled OBO through ModelServingUserCredentials, which provided the requesting user’s credentials to the model for authorizing its tool calls.
The app on the other hand receives the user’s token directly instead, every request carries the token in the x-forwarded-access-token header, and the agent creates a workspace client from it whenever it calls a tool. The tool call then runs with the permissions of that user.
Even though the assistant took care of the code, we still tested everything manually, and the OBO setup failed this testing. The assistant had programmed the app’s service principal as a fallback for OBO. When a request came from a user who didn’t have access to a resource, the tool call fell back to the service principal and succeeded anyway. We made code changes to remove this fallback and enforce OBO for every tool call. This makes it important that in the end you also perform manual e2e testing in order to make sure that the code agent produced is working as expected.
On the client side, consumers of the agent also need to change the agent’s address from the serving endpoint URL to the app URL.
Closing Notes
The goal of this post was understanding rather than steps. The agent templates and skills will scaffold, migrate, and deploy an agent app for you. What remains is knowing how the pieces fit: the @invoke and @stream handlers on /invocations, the lifespan that opens your Lakebase pool once, the proxy middleware that joins the agent and the chat UI in one container, and the OBO token in the x-forwarded-access-token header. That knowledge is what lets you customize the server, extend the chat UI, and catch the things automation gets wrong, as our OBO fallback bug showed.
If you’re starting a new agent, begin with the agent authoring guide and the app templates. If you’re migrating, the official migration guide pairs with the experience we described here.